Audio Bootcamp – Improve your Twitch Audio by 100%

I’ve noticed some streamers own great mics, but often audio can be muddy or distorted and generally not as “pro” as it could be. The mix balance is sometimes off and the audio experience can grate on the ears, especially if you have the stream playing back on big speakers that are loud!
A well balanced stream is a joy to listen to, it should aim to have game audio mix as loud as possible with the streamer’s mic clearly audible but not riding too loud on top of the game audio mix. Think of a great song mix : the band sounds huge, loud and fat but the lead vocal is clearly audible and huge in its own way. Most good audio mixes strive for this balance and your twitch streams should too!
If you listen to a well balanced game mix with speech you’ll hear the same mix elements at play. Its always a juggling act between the game SFX, music and speech (or VO) and when you get it right, the user experience is fantastic.
Check out the Armillo Cinematic trailer (the first 25 seconds).

Another good example from a Need For Speed Cut-Scene:

So how can you get this sound, for your stream ? Lets break down some of the concepts used in the above examples:
1 – Microphone [placement, mic-type, audio preamp]
2 – Environment [ What does your room sound like, fan noise, reflections]
3 – Mic processing [De-Noising, De-Reverb, Aural Exciter/BBE, Multiband-Dynamics, EQ, Single-band Compression, De-Essing, Limiting]
4 – Game Audio Output – Processing [Multiband Dynamics. Brick wall limiting]
5 – Adaptive Frequency Ducking [Duck certain frequencies from the game audio while you speak, don’t duck when you are silent]
6 – Will It Blend? Blend two sources to taste: aim for big game audio, smooth frequency response, no audio spikes […think of a TV newscast or a Hollywood film]
Part 1 – The Microphone
 Large diaphragm Condenser mics make your voice sound great. Big, full with crisp top end and lots of bottom. I use the Audio Technica AT4033/CL for a lot of my Voice Overs and even though it’s a fantastic mic, I wound never use it for this purpose. Why…? Most condensers pick up everything, including your room acoustics, fan noise, keyboard strokes. These mics are designed to be used in a properly dampened booth for voice overs. As soon as you bring them out in a living room / bedroom the pickup pattern works against you. They might work well if your lips are right on axis and 1″ from the mic, but as soon as you turn around to look at something, you’re off axis and all that wonderful detail is replaced by a wooly, mushy sound plus room noise. Yuk. Nice try.
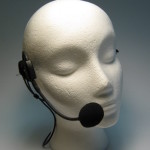
So what should you do? I recommend using a dynamic headset microphone with XLR outputs. Keeping a mic in a consistent spot 1″ away from your lips will give you the absolute hands-down best noise rejection and consistent frequency response for your stream. I have been using the Shure WH20 (street price under $100) and the sounds is great. Yes there is a slightly better condenser version (Shure PGA31) but its not XLR and proves quite tricky to wire unless you use the SHURE wireless pack. Being a dynamic mic this one will not be as sensitive as a condenser, but that works in your favour when it comes to noise rejection. You can also process this mike to sound pretty frikken awesome so don’t worry that this mike isn’t the most expensive one, we’ll make up for it a bit later.
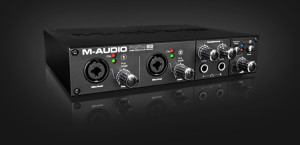 The Preamp: Any USB/Firewire Audio card with an XLR inputs will work fine. Avoid using your PCs built in card as it won’t accept a balanced input (XLR) and will add 8-10 db of straight up white noise. Hiss and grounding hum usually come for free with any built-in card so avoid these like the plague. I use and recommend the lower end M-Audio cards like the M-Audio 410 or M-Audio Profire 610. They have 4 inputs (in case you need moar clean inputs). These are discontinued so pick them up on ebay ~$100. Score!
Part 2 – Your Environment
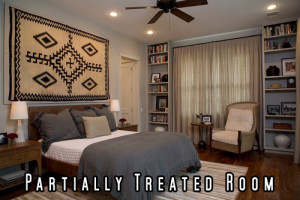 Be very aware of how your voice sounds in your space. Clap your hands to get a sense of how much reverb you have. The less the better! Most of us can’t use a dedicated voice booth for our streams but there are easy solutions to improve your space for recording:
– close your curtains (open windows reflect more)
– throw down an area rug
– if you have blinds play with the angle and try leaving them half open or at 45%. This will break up reflections in your room.
– close your windows – street noise & wind can creep into the mic
– turn off unnecessary noise sources (fridge, other PCs, cat)
– hang a blanket over bookcases or anything upright. Sleeping bags, packing blankets, area rugs or duvets on walls work well at absorbing room reflections.
